“Always remember, others may hate you, but those who hate you don’t win unless you hate them, and then you destroy yourself.”
— Richard Nixon.
My name is Tim Schofield, I have worked as an accountant in the UK since the early 1980’s. I have been interested in writing software since acquiring my first Sinclair Spectrum. A large amount of my professional career has been spent implementing ERP companies at a number of sites..
This is why I became interested in working on Open Source ERP solutions. I tried several, and in the end settled on the webERP system, which I still help out on, and latterly with KwaMoja.
This blog is intended to be some thoughts on KwaMoja, some development tips, and some tutorials on how to use different parts of the system.
It is hoped that they prove useful to some people some where.
The KwaMoja team are proud to announce the release of version 20.03 of our open source ERP system. The code can be downloaded from here.
Installation instructions can be found here. The system can be installed manually or by using the KwaMoja installer.
KwaMoja is based on the webERP system, and contains all of the functionality of webERP but with the addition of many new features. These include, in no particular order:
Warehousing functionality. A warehouse can be described down to bin level if required.
Upload attachments on sales orders.
Multi-language general ledger and stock descriptions.
Updated themes with a coordinated look and feel.
System automatically detects a right-to-left script and uses appropriate css.
Upload scans of expenses receipts.
More intuitive work order system.
Updated BOM system.
Create and save templates for regular journals.
General Ledger transactions can have multiple tags.
Flexible sales commission system.
User configurable dashboard.
Flexible ABC stock rankings.
Upload attachments for customer branches.
and many others……
A script is provided to convert from the latest webERP to KwaMoja and this can be found here. As described in this blog post, all care must be taken using this script.
KwaMoja now has the ability to store stock in containers within a warehouse, down to any level you choose to define. So for instance an item can be stored in a particular bin, in a particular bay, on a particular aisle, in a particular warehouse. However it doesn’t have to be in this form, it could be a tank, in a block of tanks containing liquids in a warehouse, or a box in a refrigerated container, or any other method of storing stock items. It can also be one warehouse with a mixture of any of the above systems used to define it. Any area where stock can be stored, or which can have areas within it where stock can be stored is termed a “Container”. If you do not define a warehouse layout for a location then KwaMoja will continue to carry on behaving as before.
When you enter the locations management screen from the setup menu you see a list of the currently setup locations with an option for “Define Layout”.
Clicking on this option takes you to the warehouse layout screen:
All containers must have an ID which can be up to 10 characters in length, and can contain numbers and letters. The description can contain up to 50 alpha numeric characters, and should accurately describe this container. The only container to not have a parent is the container for the warehouse itself. All other containers must have a parent. The next four flags determine how this container can be used.”Allow Putaway” defines whether new stock can be placed directly to this container, “Allow Picking” defines whether this area can be used to fulfil picking requests, “Allow Replenishment” defines whether the stock level in the container should be replenished when falling low, and “Quarantine Area” defines whether the container holds quarantined stock, awaiting QA approval. These flags are only partially implemented. The next two sections allow you to define the position and size of the sub-container, within it’s parent container. If there are sub-containers defined then clicking the parent container in the list will reveal them:
If a warehouse is defined with sub-containers, then when stock transactions occur for that location then an option appears to choose which container to use – assuming that the container has the correct flag set for that type of transaction:
If no sub-containers are defined, then KwaMoja continues to act as it always has done.
Thanks to Juergen, KwaMoja now works seamlessly with languages that use a right to left script. When a left to right language (for example English) is chosen, all appears correctly:
but if we now swap to a right to left language (for example Farsi) KwaMoja automatically detects this and changes the css appropriately:
This is a big step forward to making KwaMoja truly international.
“A bill of materials or product structure is a list of the raw materials, sub-assemblies, intermediate assemblies, sub-components, parts, and the quantities of each needed to manufacture an end product. A BOM may be used for communication between manufacturing partners or confined to a single manufacturing plant.”
KwaMoja allows for the creation of single or multi level BOMs that fit this definition. This example will be based on this recipe Victoria sponge cake. A few minor ingredients have been omitted for ease, this is not a cooking lesson!!. The example BOM is already set up in the KwaMoja demo and you can follow it there.
First off the parts need to be set up as inventory items using Stocks.php from the “Add a New Item” option on the Maintenance section of the Inventory module. The parts to create are:
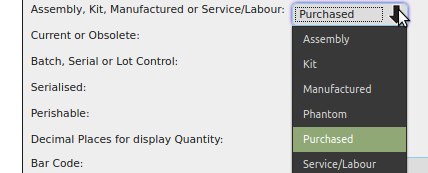
As can be seen, the final cake is made up of two parts, the base, and the filling. These two parts are then made up of 4 and 3 bought in parts respectively. When setting up the items the most important field to get right is the “Assembly, Kit, Manufactured or Service/Labour:” field. For any part that is manufactured it should be set to “Manufactured”, bur for the raw materials it should be set to “Purchased”. Only parts set as Manufactured can have a BOM associated with them.
To construct or amend a BOM choose the “Bills of Material” option from the Maintenance section of the Manufacturing module.
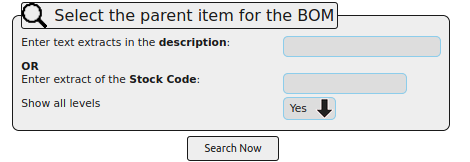
Firstly we must select the top level parent item.
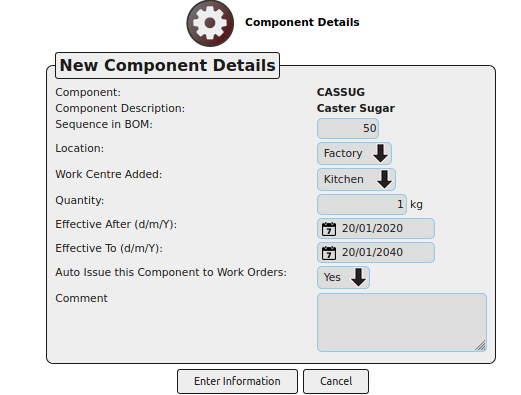
Then choose the component parts. The entry screen for each component will look like this: The “Sequence in BOM” field is an integer indicating the order in which the parts are used. The sequence numbers can be automatically updated if you later insert components. The “Location” field is the physical warehouse/factory where the manufacturing takes place. It is possible to have different BOMs for the same product made in different locations. The “Work Centre Added” field denotes the work centre where this component is added to the product. For the purposes of this example the same work centre is used for each component, but it doesn’t have to be. The quantity field is the amount of this component needed, in the units in which the component is stored. The Effective From/To dates are the dates between which this component will be part of the BOM. If the component is set to “Auto Issue” then when a work order for this parent is received, the parts marked “Auto Issue” will be automatically deducted from stock. Finally you can add any comments for each line of the BOM.
As has been said in a previous post, KwaMoja grew out of the webERP project. Over the years we have always attempted to bring any changes made in webERP over to KwaMoja. However there are a lot of improvements we have made in KwaMoja which were never taken by those in charge of the webERP project.
People have asked me about the procedure for moving from webERP to KwaMoja, so I have decided to create a script that performs this transition automatically. The project is hosted on GitHub and can be found here: https://github.com/timschofield/webERP2KwaMoja
The script is written using the PHP command line interface – Yes I know, but it was just more convenient as I already had a lot of the code written and could just pull it from the KwaMoja repository.
This script is designed to convert a webERP database into a KwaMoja database. It performs other housework on your new KwaMoja instance to enable it to run with your webERP data. To run this script you will need to have both the webERP and the KwaMoja code installed on the same machine that you are running this script.
This script assumes that the database user and password in the config.php file in your webERP instance has permissions to CREATE and DROP databases. If this is not so, you should temporarily make it so. Please see the mysql documentation if you are unsure how to do this.
This script takes 3 parameters. The first is the name of the webERP to be converted. This database will not be altered, and the new database will have this name but will have a suffix of _1 attached to it. eg If your webERP database is called weberp then the converted database will be called weberp_1. WARNING – If a database already exists with this name then it will be deleted. The second parameter is the path to the webERP code. This can be an absolute path, or a path relative to the directory that the script is being run from. The third parameter is the path to the KwaMoja code. This can be an absolute path, or a path relative to the directory that the script is being run from. So running the script in the web root, with a webERP database named weberp the command would look something like:
WARNING – Please note. Every effort has been made to ensure this script runs safely. However the KwaMoja team accepts no responsibility for any data loss that might occur. It is your responsibility to ensure you have backed up all your data correctly.
The command takes about 20 minutes to run on my very old laptop, so should be quicker than that on most machines. Once it has run, just point your browser at the KwaMoja code, and you should see your webERP company listed in the company selection drop down box. Choose this, and login using your webERP login.
You should thoroughly check that everything is now working as you expect. Pay special attention to the System configuration settings as KwaMoja adds many settings that weren’t available in webERP. Also the modules users can see may have been changed, so you should just check that.
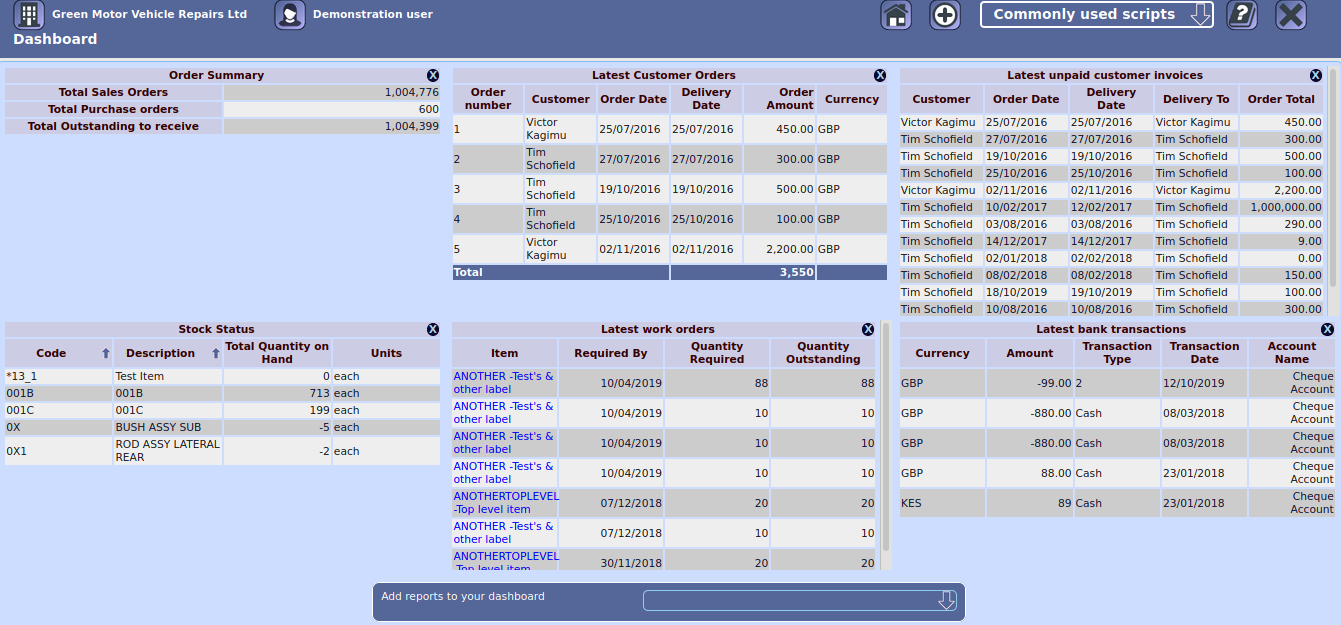
The purpose of a dashboard within an ERP is to provide each user with key data (KPIs) referring to their job. This way, each user can quickly see how they are performing and take appropriate action when necessary. In order to achieve this the dashboard needs to be easily configurable, and extendable. The KwaMoja dashboard fulfils all these criteria.
The main dashboard screen
The main dashboard screen itself is found by clicking on the dashboard icon in the header of each KwaMoja screen. The screen consists of two rows of the mini reports, with a maximum of 6 mini reports allowed for each user. Reports can be removed by clicking on the “X” on the right hand side of the header row for the mini report in question. New reports can be added by using the drop down list at the bottom of the screen. Each report is designed to represent one KPI.
Creating a new mini report
A few sample reports are included with KwaMoja, but it is envisaged that companies will wish to extend the dashboard by writing their own mini reports. This only requires a small amount of knowledge regarding of SQL and HTML, and can easily be picked up.
To facilitate this KwaMoja comes with a template designed to be used for creating new mini reports. This template can be found at dashboard/template.php. The first stem is to copy this file and rename the copy for our new report. It must be stored in the dashboard/ sub folder, and have an extension of .php. For this example we will create a report showing the most recent goods received. Let us call this report latest_grns.php, and store it in the dashboard sub folder.
The first section of the template file is as follows:
/**********************************************************/
$PathPrefix = '../';
if (basename($_SERVER['SCRIPT_NAME']) != 'Dashboard.php') {
require_once ($PathPrefix . 'includes/session.php');
$DashBoardURL = $RootPath . '/Dashboard.php';
}
$ScriptTitle = _('Enter the script title here');
$SQL = "SELECT id FROM dashboard_scripts WHERE scripts='" . basename(basename(__FILE__)) . "'";
$DashboardResult = DB_query($SQL);
$DashboardRow = DB_fetch_array($DashboardResult);
echo '
';
/* The section above must be left as is, apart from changing the script title.
* Making other changes could stop the dashboard from functioning
*/
All we need to do here is to change the title of the script, so change the value of $ScriptTitle to _(‘Latest goods received notes’). The next section of the template is as follows:
/**********************************************************************/
$SQL = "";
$DashboardResult = DB_query($SQL);
/* Create an SQL SELECT query to produce the data you want to show
* and store the result in $DashboardResult
*/
This is where some basic knowledge of SQL is needed. We need to create a simple SELECT statement that retrieves the columns that we require. Looking at the grns table in the database we need the columns `grnno`, `deliverydate`, `itemcode`, `itemdescription`, and `qtyrecd`. The SQL statement then becomes“SELECT grnno,deliverydate,itemcode,itemdescription,qtyrecd FROM grns ORDER BY deliverydate DESC LIMIT 15”
In other words we pull the 5 fields from table grns, sequence them by descending order of delivery date, and just retrieve the most recent 15 GRNs. This is then assigned to the $SQL variable in the script.
The next part of the template is for the column headings:
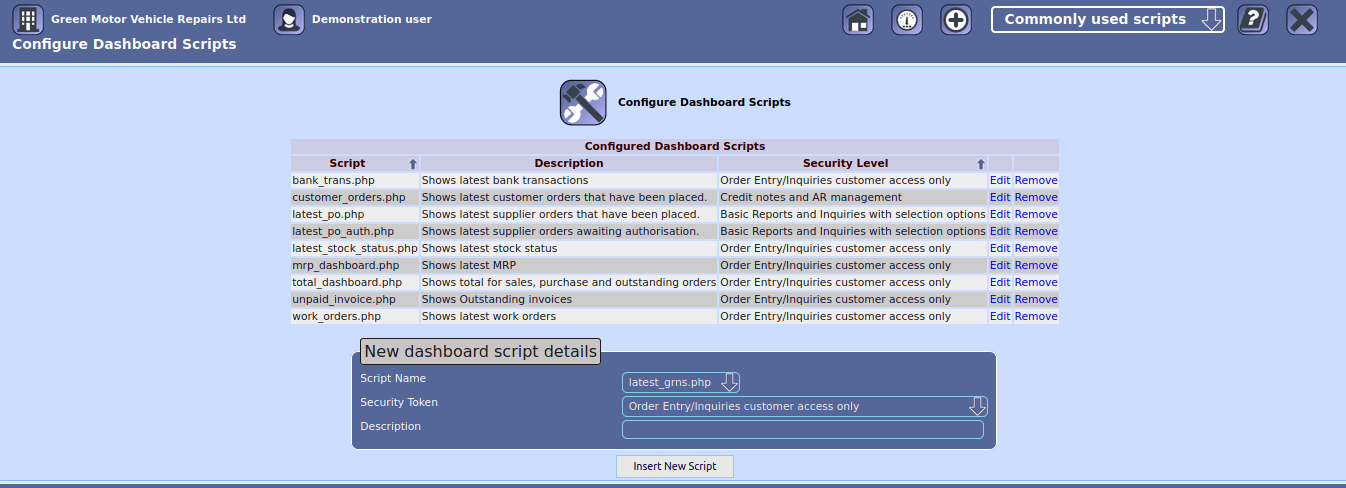
The final stage, is to tell KwaMoja about the new mini report, and to configure it’s security settings, and description. This is done via the ‘Configure the Dashboard’ option on the ‘Setup’ menu.
On this screen any scripts that are not currently installed are listed in the drop down section in the input section:
As can be seen only our new script is waiting to be installed so we select that.
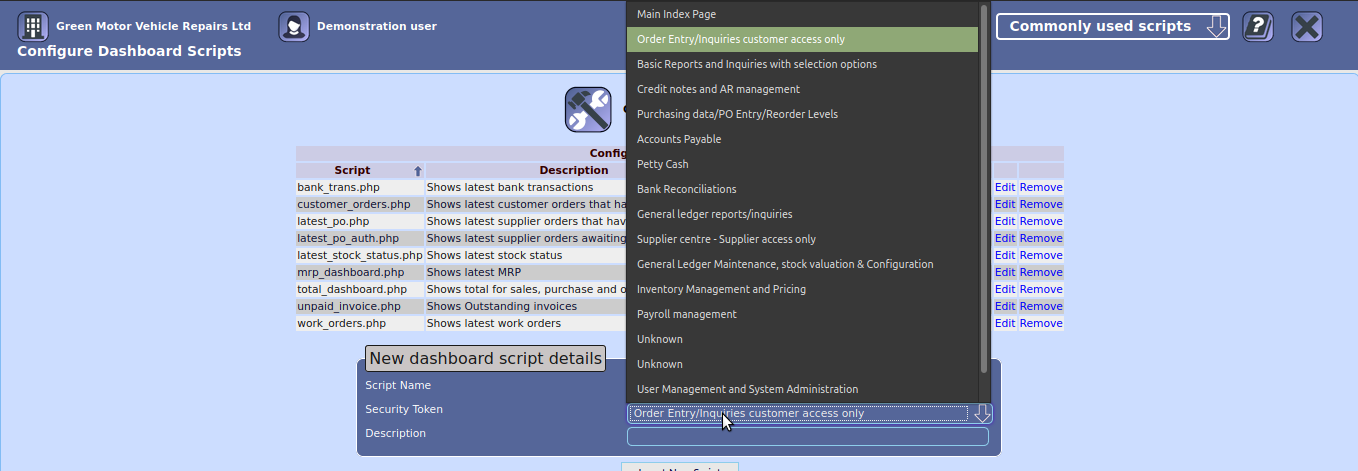
Next we choose what security token to allocate to this script. This decides who will be able to have it on their dashboard
Finally we input a description for this mini report. This description will appear in the drop down box on the actual Dashboard screen.
The installer is currently undergoing some major work, so for the moment it is advisable to install manually. This is a a tutorial on how to achieve this.
A manual installation consists of the following five steps:
Copying all the PHP scripts and include files to a directory under the web server document root directory.
Creating the database and populating it with initial data
Editing config.php for the database connection information and any other requirements
Logging into the system for the first time
Setting system parameters
Setting up company specific information in the system
All files in the archive should be copied to a directory under the web server Document Root directory. This varies by web server and operating system, and you should refer to the documentation to find the location on your server.
Extract the archive into this location. A KwaMoja directory will be created in this location and all scripts and other directories will be copied to that directory.
Creating the Database
KwaMoja currently only works with MySQL or MariaDB database servers.
You need to know the user name and password for your database server. If you have not set these up the default is often:
user root password “”
BUT … you should NOT use this account. You should set up another user for your MySQL installation and change the root password to something other than “”.
All instructions for using MySQL refer to the command line client that comes with MySQL. To run this under Windows a DOS box must be opened. The mysql.exe binary is located by default under C:\mysql\bin\mysql.exe. This would be the command line statement required to run the MySQL client. The options discussed below should be appended as required. There are a number of graphical clients for MySQL and if you prefer to use one of these you should be prepared to amend the instructions below appropriately.
From the MySQL manual (edited):
The MySQL root user is created as a superuser who can do anything. Connections must be made from the local host. NOTE: The initial root password is empty, so anyone can connect as root without a password and would have all privileges. Because your installation is initially wide open, one of the first things you should do is specify a password for the MySQL root user. You can do this as follows (note that you specify the password using the PASSWORD() function):
You can, in MySQL Version 3.22 and above, use the SET PASSWORD statement:
shell> mysql -u root mysql mysql> SET PASSWORD FOR root=PASSWORD(‘new_password’);”
where ‘new_password’ is the new password you chose for the root user.
Also from the MySQL manual (edited): Also, if you have changed the root user password, you must specify it for the mysql commands below. You can add new users by issuing GRANT statements:
shell> mysql –user=root -p ‘new_password’ mysql mysql> GRANT ALL PRIVILEGES ON *.* TO kwamoja@localhost IDENTIFIED BY ‘some_pass’ WITH GRANT OPTION;”
Where ‘some_pass’ is a password of your choice for the new user ‘kwamoja’. Note that this user ‘kwamoja’ can only connect from the local machine so if the web server is on a different machine then the MySQL server you need to give privileges to connect from other computers. See the MySQL manual.
Innodb tables must be enabled in the MySQL server. These tables allow database transactions which are a critical component of ERP software. Innodb tables require some parameters to be set up in my.cnf. There are some examples in the MySQL manual under table types – Innodb tables.
If you have an account set up already in MySQL and Innodb tables enabled, then all you need to do is to run one of the sql scripts.
Two scripts are provided under the KwaMoja/sql/mysql directory (folder):
structure.sql As the name implies this file contains the structure of the database. Running this will just create all the necessary tables for KwaMoja to run. By default the database name will be KwaMoja. If you want a different database name, then change the ‘CREATE DATABASE’ and the ‘USE’ lines.
base.sql This script has only the basic data necessary to start a new company. If you wish to set up your company using the KwaMoja software, then this is the script to use. This creates a KwaMoja database and populates it with only the very basic starting data.
The files structure.sql and base.sql should be in the directory with all the PHP scripts. Change to the directory where the scripts are held or use the full path and enter:
shell > mysql –user=kwamoja –password=’some_pass’ < path_to_web_server/KwaMoja/sql/mysql/structure.sql
and
shell > mysql –user=kwamoja –password=’some_pass’ < path_to_web_server/KwaMoja/sql/mysql/base.sql
Modify the user entered here as ‘kwamoja’ to the user you created in MySQL for the purpose, and modify the password stated here as ‘some_pass’ to the password appropriate for the user. Also modify the path_to_the_sql_script to the appropriate path.
Editing config.php
config.php contains a series of user defined variables that determine how the system behaves. Critically it contains the host (computer name), username and password of the database connection required to connect to the database server. There is also an option to chose which type of database server is to be used. Currently there are only options for MySQL and MySQLi. There is no going forward without this data.
The default settings for config.php are in the file config.distrib.php and this file should be renamed config.php.
The default contents of the config.php file are as follows and must be edited in an editor of choice. Then, save config.php in the web directory where the scripts are located. Note, the system is continually evolving and may well have changed since this was written.
The file is well commented, with each setting having a detailed explanation. It is vital that at a minimum the database settings are changed to your own.
At this point you should also copy the contents of the companies/default/ folder into a new sub folder called companies/KwaMoja/ or whatever the name of the database you created above.
Logging in to the system
If you now point your web browser at the location you loaded the code you should see a login box looking like this:
To improve the look of this you can create a file companies/KwaMoja/Companies.php which looks something like this:
So that the company name will now appear in the login box. The user name and password combination will be admin/kwamoja. As soon as you login KwaMoja will insist you change this password to a more secure one. Once this is done the system will log you out, and you can log back in with the new password. You now have a working KwaMoja system
When you are back in, KwaMoja will take you through some steps to initialise important information, but I will go through this in a later blog.
KwaMoja grew out of a course of lectures I gave at a community college in Kenya several years ago. The course was based on the WebERP open source project that I had been a developer on for many years. Several of the students wanted to carry on the work we had done on the course, by taking the webERP code and expanding on it, and so I agreed to help where I could. Unfortunately it didn’t work out, the webERP admin took exception to what they were doing, things got toxic, and unfortunately they felt they had to give it up.
Since then I have used the KwaMoja repositories to maintain my companies own code, which is based on the KwaMoja code.
I have recently been approached by some colleagues and friends with a view to restarting it as a proper open source project. This will require some work to get the code right for release, as it is currently only suitable for experts in the system to deploy. This blog is part of that effort.
If you wish to get involved in this effort, leave a comment on this post, or email me on tim@weberpafrica.com